Building a Leak-Proof Wet Room: Core Waterproofing Principles
Modern homes increasingly feature wet rooms, where seamless floors and open showers create an illusion of expansive calm. These designs demand meticulous waterproofing to avoid the pitfalls of hidden leaks, mold growth, and structural damage. Success hinges on systematic approaches that prioritize floor slopes, membrane integrity, and integrated components over superficial finishes.
This guide outlines key principles drawn from professional installations. Homeowners benefit from understanding these steps to oversee builds that deliver commercial-level reliability in a residential setting. Focus on precision in gradients and seals transforms a wet room from a stylish choice into a functional asset.
1. Establish Precise Floor Slopes for Effective Drainage
Challenge: Inadequate slopes lead to water pooling, which stresses seals and promotes leaks over time.
Background: Wet rooms require gentle gradients to direct water toward drains without compromising aesthetics or accessibility. Flat floors invite failure, while excessive slopes disrupt usability.
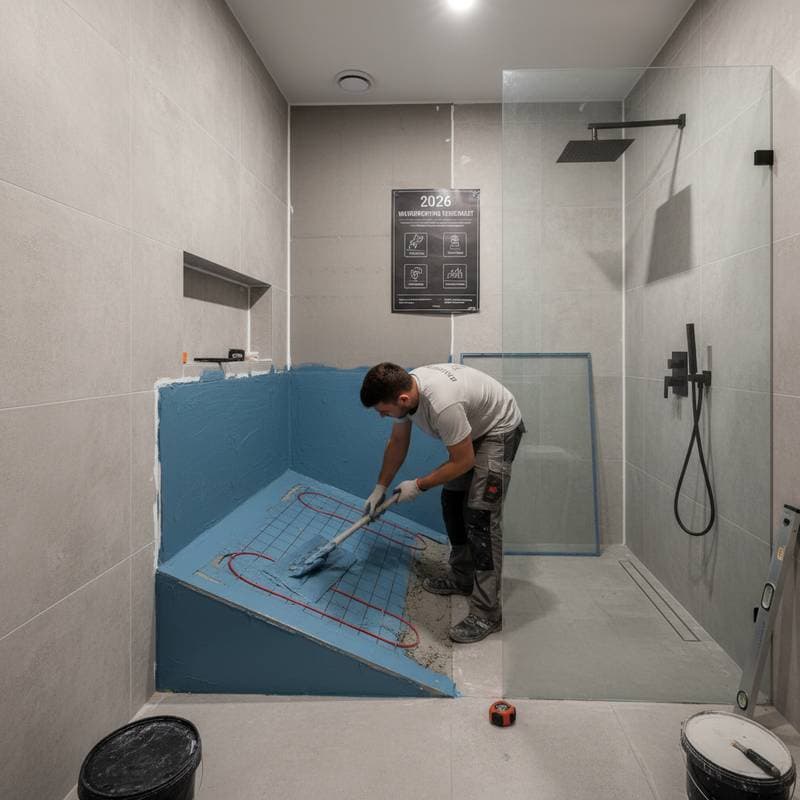
Approach: Aim for a 1:40 to 1:60 slope ratio across the floor, measured from the farthest point to the drain. In curbless designs, create a four-way fall for center drains or a two-way fall for linear ones, ensuring the slope begins immediately beyond the shower zone.
Implementation Notes: Use self-leveling compounds or screeds to form gradients during substrate preparation. Verify slopes with a laser level before applying membranes, adjusting as needed to avoid low spots. For larger areas, divide the floor into zones with subtle ridges if necessary.
Advantages: Correct slopes facilitate rapid drainage, minimize slip risks, and protect underlying structures by preventing water stagnation. This foundation supports all subsequent waterproofing layers.
2. Seal the Substrate Thoroughly
Challenge: Grout and tiles alone cannot repel moisture; water penetrates joints to damage the base material.
Background: Effective waterproofing treats the floor and walls as an integrated barrier system, applied prior to finishes.
Approach: Install a liquid or sheet membrane covering the entire floor and rising 150 millimeters up adjacent walls. Reinforce corners with fabric strips or molded fittings to bridge vulnerabilities.
Implementation Notes: Inspect concrete substrates for fissures and apply primers on absorbent surfaces. Overlap sheet membrane joints by 50 millimeters minimum, using compatible adhesives. Extend coverage under fixtures like vanities for comprehensive protection.
Advantages: A sealed substrate safeguards against grout failures, preserving the building's integrity and extending the lifespan of the installation.
3. Design Drainage as an Integrated Network
Challenge: Selecting drains based on appearance overlooks compatibility with slopes and membranes, leading to backups or overflows.
Background: Options include linear, central, or wall-mounted drains, each influencing slope configuration and flow dynamics.
Approach: Position linear drains along walls to align with natural two-way slopes. For central drains, engineer a balanced four-way pitch. Ensure the drain flange bonds seamlessly with the waterproofing layer.
Implementation Notes: Conduct a preliminary water flow test during layout. Secure watertight connections with manufacturer-specified sealants, and integrate hair traps to maintain efficiency.
Advantages: A cohesive drainage system removes water swiftly, simplifies upkeep, and prevents odors or microbial buildup.
4. Incorporate Underfloor Heating Safely
Challenge: Placing heating elements without barriers risks moisture trapping, which warps adhesives or fractures tiles.
Background: Heated floors enhance comfort in wet rooms, but layering must preserve waterproofing efficacy.
Approach: Position heating mats above the primary membrane and beneath a decoupling or leveling layer. This sequence isolates heat from moisture while promoting even warmth.
Implementation Notes: Install sensors linked to programmable thermostats for temperature regulation. Measure electrical resistance pre-installation and avoid disruptions near drains. Opt for flexible mats compatible with thin-set mortars.
Advantages: Thoughtful integration delivers consistent comfort without undermining seals or durability.
5. Perform Rigorous Pre-Tiling Tests
Challenge: Visual checks miss subtle defects like pinholes, allowing leaks to emerge post-installation.
Background: Early verification prevents costly interventions once tiles obscure the system.
Approach: Seal the drain and flood the area to wall base level for 24 hours. Monitor for level drops or subsurface dampness.
Implementation Notes: Add dye to the water for leak visualization. Dry the membrane fully afterward, and document results for warranty purposes.
Advantages: Validation at this stage confirms reliability, averting future disruptions and expenses.
6. Balance Accessibility and Water Containment
Challenge: Seamless entries risk uncontrolled splashing, yet barriers must not hinder mobility.
Background: Curbless thresholds define wet rooms, requiring subtle controls to direct water while ensuring safe passage.
Approach: Employ low-profile channels, angled glass enclosures, or zoned flooring to channel flow. Maintain clear pathways with minimal elevations.
Implementation Notes: Secure panels in sealed tracks, leaving 10-millimeter gaps for ventilation. Align slopes to guide water away from transitions.
Advantages: These measures sustain openness and usability alongside effective moisture management.
Sustaining Long-Term Performance
A well-constructed wet room integrates into daily routines with minimal intervention. Inspect seals, grouts, and drains periodically to address wear promptly. Professional oversight during initial phases yields spaces that dry quickly and function reliably.
Installations adhering to these principles endure without incident, offering tranquility through unseen robustness. The result is a bathroom that enhances living without demanding attention.
Implementing Your Wet Room Project
Initiate with detailed planning: Select contractors versed in these methods and require documented protocols. Demand warranties, data sheets, and pre-tiling tests. For self-directed projects, prioritize slope accuracy and membrane continuity.
Such diligence unlocks the full potential of wet room design, blending form, function, and resilience seamlessly.


