Essential 2025 Contractor Checklist for Wet Room Installations
Walk into ten different bathrooms, and you will likely see ten different approaches to wet room design. Some emphasize luxury finishes, others prioritize accessibility or minimalist style. Beneath all that variety lies a shared truth: every successful wet room begins with disciplined preparation and precise execution. When the waterproofing fails, the entire investment unravels.
This checklist distills years of on-site experience into practical guidance for contractors and homeowners who plan a wet room installation. These rules combine technical accuracy, real-world efficiency, and professional craftsmanship. Whether you renovate a small ensuite or build a high-end spa retreat, these principles form the backbone of a system that works and lasts.
1. Prepare the Substrate Properly
Problem: Inadequate substrate preparation creates unstable bases that crack under tile weight or fail to bond with waterproof layers, leading to early failures.
Context: Substrates range from concrete slabs to timber floors in renovations; each demands specific treatment to handle constant moisture exposure.
Solution: Inspect and level the substrate thoroughly. Apply self-leveling compounds to uneven surfaces, and for timber subfloors, install marine-grade plywood or treated boards rated for damp environments.
Technical Detail: Verify the substrate remains dry and free of dust, grease, or loose particles. Prime the surface according to the waterproof membrane manufacturer's specifications to enhance adhesion.
Benefit: A stable substrate supports all layers above, minimizes movement that could compromise seals, and lays a reliable foundation for waterproofing success.
2. Establish Correct Falls Before Tiling
Problem: Incorrect floor gradients result in standing water, slippery surfaces, and mold growth over time.
Context: Clients frequently request seamless appearances with large-format tiles, yet undefined falls hinder effective drainage.
Solution: Construct the wet area with a uniform fall toward the drain, targeting a slope of 1:60 to 1:80 based on tile dimensions and texture. Incorporate pre-formed shower trays or screeds featuring integrated gradients for precise results.
Technical Detail: Verify falls with a long spirit level or laser device prior to membrane application. Eliminate sharp transitions that might cause water pooling.
Benefit: Efficient water flow directs moisture to the drain quickly, allows surfaces to dry promptly, and simplifies cleaning. The floor stays comfortable underfoot while resisting slips.
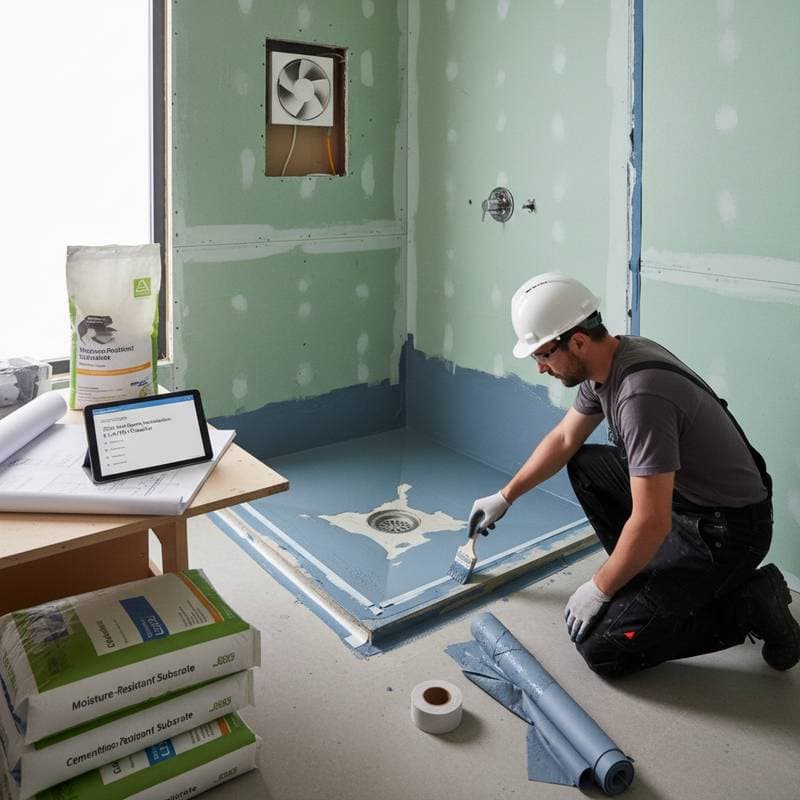
3. Apply Waterproof Membranes Thoroughly
Problem: Incomplete or hasty membrane application permits water penetration behind tiles, resulting in structural damage and costly repairs.
Context: Membranes serve as the primary barrier in wet rooms, covering floors, walls to at least 2 meters high, and areas around fixtures.
Solution: Choose tanking sheets or liquid-applied membranes certified for immersion in wet environments. Apply in two or three coats, ensuring overlaps of at least 50 mm at seams and full coverage without gaps.
Technical Detail: Reinforce joints, corners, and pipe penetrations with fiberglass mesh or fabric embedded in the membrane. Adhere to curing times, typically 24 to 48 hours per coat, under controlled temperature conditions.
Benefit: A robust waterproof layer safeguards the building envelope from moisture damage, extends the lifespan of the installation, and meets building code requirements for wet areas.
4. Plan the Drainage Strategy Early
Problem: Late decisions on drain locations lead to awkward pipe routing or insufficient fall depths, delaying projects and disrupting waterproofing integrity.
Context: Renovations often constrain plumbing by existing joists, beams, or slabs; modifications after initial setup prove expensive and invasive.
Solution: Finalize drain position and type during the design phase. Opt for linear drains along walls or thresholds to accommodate large tiles, or central point drains for compact layouts.
Technical Detail: Allocate adequate depth for trap components, maintaining a minimum 50 mm water seal to block odors. Test all drain assemblies for flow and seal before enclosing them.
Benefit: Strategic drainage facilitates rapid water evacuation, streamlines waterproofing details, and elevates the aesthetic appeal. It also prevents mid-project structural alterations.
5. Integrate Fixtures with Waterproof Continuity
Problem: Fixtures installed without proper waterproof ties create vulnerable points where leaks can develop and spread.
Context: Elements such as shower screens, vanities, and glass panels require seamless incorporation to maintain the moisture barrier.
Solution: Extend the waterproof membrane around fixture bases and use compatible flashing materials. Seal all penetrations with high-adhesion, flexible compounds.
Technical Detail: Apply membrane up the walls behind fixtures and overlap with wall linings. For pipe entries, employ pre-formed collars or bendable sheet flashing to ensure a watertight seal.
Benefit: Integrated fixtures eliminate hidden leak paths, enhance overall system reliability, and preserve the clean, modern look of the wet room.
6. Select Materials Suited to Constant Moisture
Problem: Selecting materials for visual appeal alone, without moisture resistance, causes rapid deterioration like warping or staining in humid settings.
Context: Clients desire natural textures, but wet rooms demand materials that withstand prolonged exposure without compromise.
Solution: Specify porcelain or glass tiles for floors and walls, paired with engineered stone or sealed composites for counters. Choose stainless steel or chrome-plated fittings and marine-grade hardware for durability.
Technical Detail: For any timber components, select hardwoods finished with two-part polyurethane or epoxy sealers applied in multiple layers. Incorporate ventilation slots in cabinetry to mitigate condensation.
Benefit: Resilient materials retain their appearance over years, inhibit mold proliferation, and lower long-term upkeep expenses. The space delivers refined aesthetics with dependable function.
7. Seal Joints and Transitions Securely
Problem: Inadequately sealed joints permit moisture to migrate into walls or substructures, undermining the waterproof system.
Context: Transitions occur at floor-to-wall junctions, around fixtures, and between different surface materials, all high-risk zones.
Solution: Employ 100 percent silicone sealants formulated for wet areas, applying a generous bead and tooling it smooth for optimal adhesion.
Technical Detail: Replace grout with flexible sealants in expansion joints or movement-prone areas. Inspect and reapply sealants annually to maintain integrity.
Benefit: Secure seals accommodate thermal expansion and settling without failure, preventing water ingress and supporting the installation's longevity.
8. Test Before You Tile
Problem: Omitting leak tests in favor of visual checks overlooks hidden defects like pinholes, which surface only after tiling and demand extensive fixes.
Context: Post-tiling investigations require tile removal and grout extraction, escalating costs and timelines unnecessarily.
Solution: Conduct a flood test by plugging the drain and filling the wet zone with 25 to 50 mm of water for 24 hours. Monitor and mark water levels to identify any seepage.
Technical Detail: Secure the plug without damaging the drain, and measure depth accurately with a ruler. Thoroughly dry all surfaces post-test to avoid adhesive issues during tiling.
Benefit: Pre-tiling validation confirms the membrane's effectiveness, reassures clients and contractors alike, and fulfills manufacturer warranty conditions.
9. Implement Ventilation for Humidity Control
Problem: Poor ventilation traps steam and humidity, fostering mold growth and material degradation despite solid waterproofing.
Context: Wet rooms produce significant vapor during use; passive airflow alone proves insufficient in enclosed spaces.
Solution: Install mechanical extractor fans triggered by humidity sensors or timers, ensuring external ducting for fresh air exchange.
Technical Detail: Achieve at least 15 air changes per hour, positioning intake vents low and exhaust high. Integrate with underfloor heating to accelerate drying.
Benefit: Effective ventilation sustains low humidity levels, protects finishes from condensation, and promotes a healthier, more comfortable environment.
10. Document and Maintain for Longevity
Problem: Absence of project records leaves homeowners without essential details on products or care routines, complicating future interventions.
Context: Waterproof systems rely on material compatibility; undocumented changes risk breaching the protective barrier.
Solution: Compile a comprehensive file including data sheets for membranes, adhesives, and tiles, plus schedules for sealant reapplication and filter cleaning.
Technical Detail: Capture before-tiling photos of membrane applications and key details. Store manuals for ventilation, heating, and drainage in a protective folder within the space.
Benefit: Detailed records safeguard the investment, streamline repairs or upgrades, uphold warranty terms, and ensure sustained performance.
Sustaining Wet Room Performance
A meticulously constructed wet room operates seamlessly. Water evacuates without trace, air circulates cleanly, and surfaces endure without fading. Achievement stems from meticulous attention to each gradient, seal, and layer rather than extravagant elements alone.
Contractors who adhere to this checklist demonstrate expertise and commitment to quality outcomes. Precision in wet room construction yields environments that provide reliable comfort and watertight assurance for decades.


