Prevent Leaks in Your Wet Room Remodel: Essential Strategies
Homeowners often envision a wet room as a modern sanctuary with seamless floors and open showers. This design delivers luxury, but it demands precise engineering to manage water effectively. Without proper precautions, even minor flaws can lead to water damage and expensive fixes. Professionals rely on proven strategies that integrate smart design and meticulous installation. By applying these approaches, you create a bathroom that combines elegance with reliability.
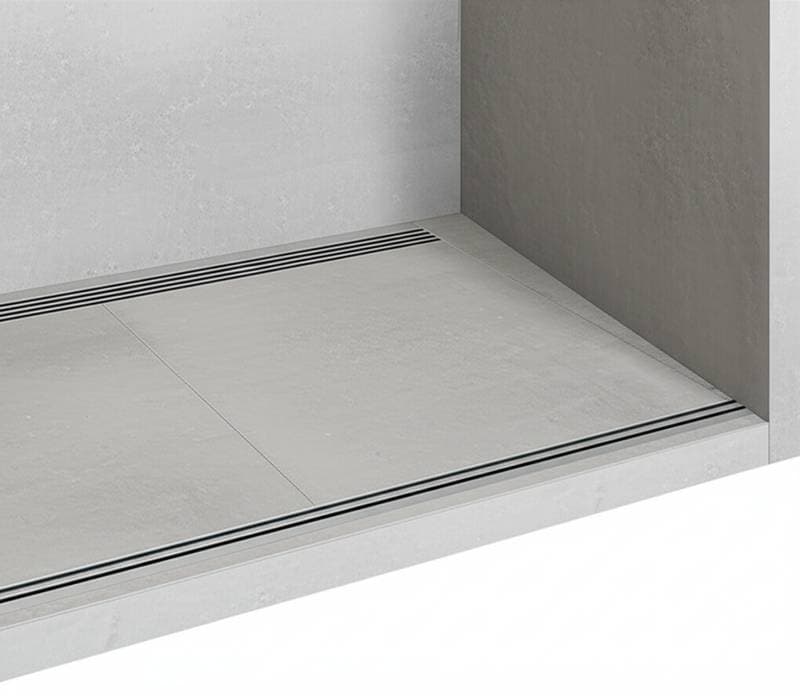
1. Establish Proper Drainage Gradients
Water must flow away from walls and toward drains without pooling. Inadequate slopes cause standing water, which seeps into joints and substrates over time.
During wet room projects, uneven floors frequently result in persistent dampness and mold growth beneath tiles.
Design the floor with a minimum 1-in-50 slope, meaning a 1 millimeter drop per 50 millimeters of distance, directing water to the drain. Use laser levels for accuracy and build in falls using self-leveling compounds or tapered screeds.
This gradient ensures efficient drainage, reducing moisture exposure and preserving the integrity of your installation.
2. Select an Effective Waterproofing System
Tiles and grout alone cannot repel water reliably; they serve aesthetic purposes rather than protective ones.
Renovation inspections often reveal hidden deterioration from insufficient barriers beneath attractive surfaces.
Install a full waterproofing membrane suited to your base material. Opt for sheet membranes for consistent coverage or liquid applications for irregular forms. Choose systems certified specifically for wet environments.
For sheets, overlap seams by 50 millimeters minimum and secure corners with specialized tape. Apply liquid types in two layers at right angles to avoid gaps.
Such a barrier confines water to the surface, safeguarding structural elements from gradual erosion.
3. Integrate High-Performance Drains
Standard drains may clog or fail under constant exposure, allowing backups that overwhelm surrounding seals.
In completed wet rooms, drain issues account for many early leak complaints as debris accumulates and water overflows.
Position linear or point drains strategically at the lowest floor points. Select models with integrated waterproof flanges that bond seamlessly to membranes. Ensure the drain grate aligns flush with the finished floor.
Test drains during installation by flooding the area and monitoring flow. Pair with hair traps and regular cleaning protocols.
Effective drains channel water swiftly, minimizing contact time with vulnerable areas.
4. Secure Wall-to-Floor Transitions
Junctions between walls and floors represent weak points where differential movement induces cracks in inflexible coverings.
A common issue arises when wall discoloration signals breaches at these interfaces, compromising the entire enclosure.
Incorporate flexible sealing profiles or molded corners at all transitions. Carry the floor membrane up the wall by at least 100 millimeters to form a continuous trough.
Apply reinforcing tape over vertical seams prior to the primary coating. Soften internal angles slightly with mortar to prevent stress concentrations.
These measures absorb shifts from settling or temperature changes, maintaining a robust seal.
5. Ensure Material Compatibility
Incompatible components lead to delamination, where layers separate and expose the substrate to moisture.
Projects suffer when adhesives react poorly with membranes, resulting in lifted tiles and water ingress.
Source integrated kits from one manufacturer, verified for mutual adhesion. Adhere strictly to technical specifications beyond basic guidelines.
Verify compatibility through curing conditions and environmental tolerances. Employ polymer-enhanced, flexible adhesives and grouts formulated for wet conditions.
Harmonious materials form a cohesive barrier, enhancing durability across the assembly.
6. Conduct Thorough Testing and Inspection
Skipping verification invites undetected flaws that manifest as leaks months later.
Post-installation oversights often turn minor imperfections into major repairs.
Flood test the system after membrane application but before tiling: cover drains, fill to 25 millimeters, and hold for 24 hours while checking for escapes.
Inspect all joints visually and with moisture meters. Address any anomalies immediately with additional sealing.
Validation confirms the setup's resilience, providing confidence in long-term performance.
Sustaining Your Wet Room's Performance
After completion, routine care extends the lifespan of your investment. Clear drains monthly to prevent blockages, and inspect seals annually for wear. Use mild cleaners to avoid eroding protective layers. These habits ensure your wet room remains functional and visually appealing for years.


